Barry's Mix Magazine Equipment And Software Reviews
Barry's Massive Discography And Engineering Career
Barry's Music Connection Magazine Reviews
Barry's Resolution Magazine Reviews
DMG Audio Limitless Mastering Limiter Plug-In
![]() Mix Magazine "Compression And Compressors"
Mix Magazine "Compression And Compressors"
By Barry Rudolph
 |
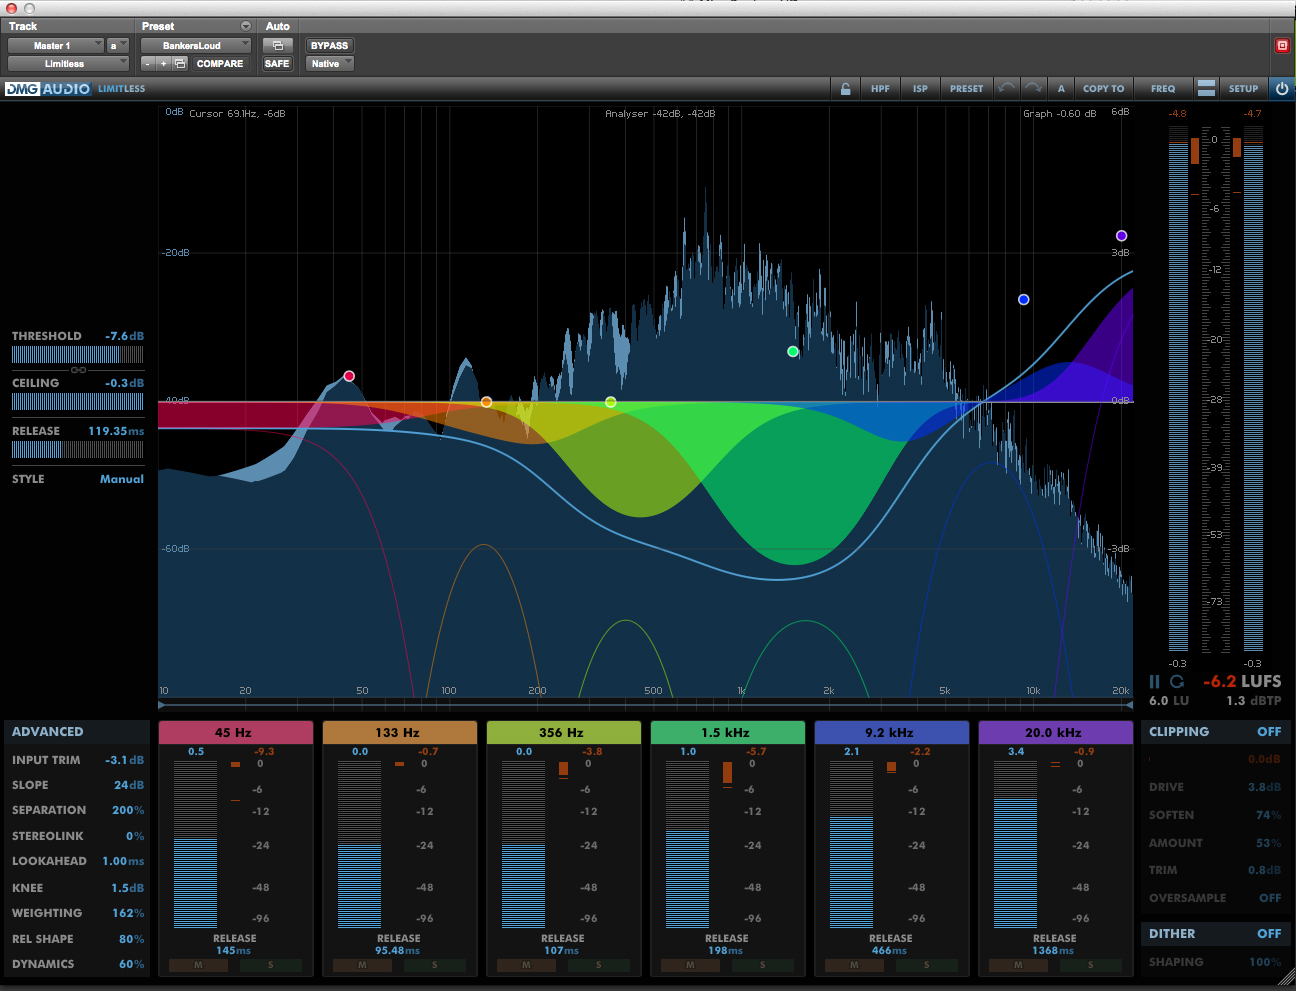
| DMG Audio Limitless Frequency Graph |
 |
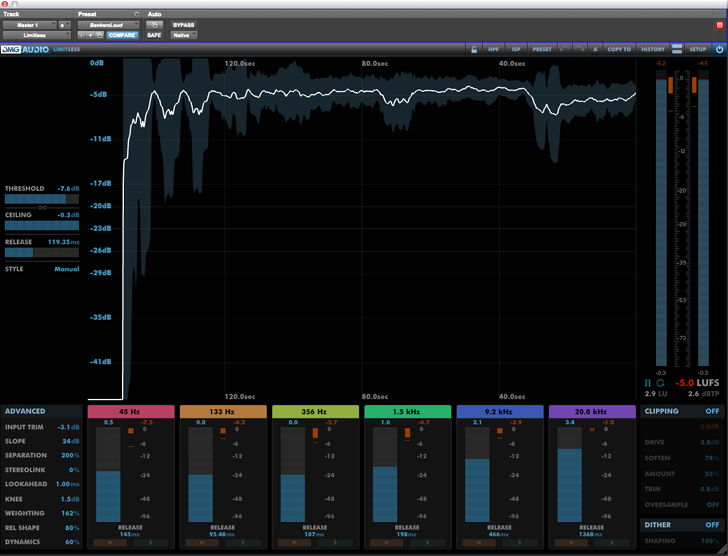
| DMG Audio Limitless History Graph |
 |
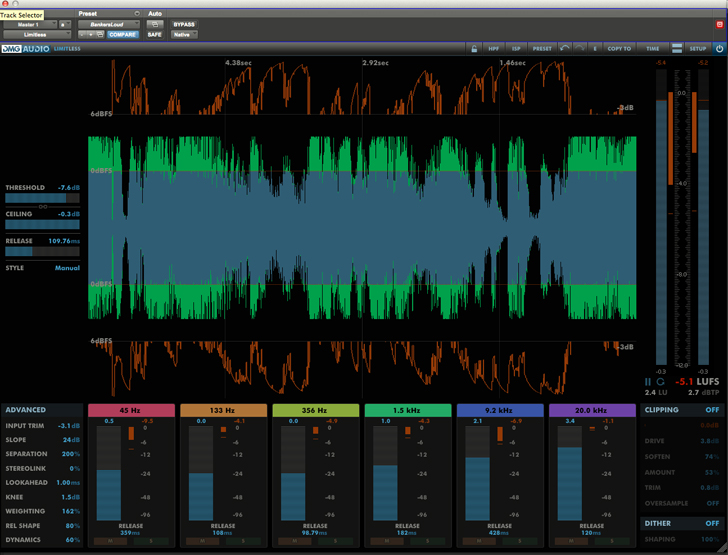
| DMG Audio Limitless Time Graph |
Limitless produces loudness enhancement to any desired stylistic effect--from transparent to very colorful--based on built-in preset Style algorithms. The six Styles are Aggressive, Punchy, Warm, Smooth, Tight and Transparent.
For the mastering engineer, Limitless is a smart "complexity inverter"; it uses numerical solvers on a sample-by-sample basis to work out the best possible limiting action for producing loudness to a specified targeted output level without clipping and without adding artifacts. As the excellently written manual states for basic workflow: "Reduce Threshold until track reaches desired loudness. Enjoy!" I liked that Limitless works straightaway like any full-bandwidth limiter--important for quickly dealing with problems.
Digging Deeper
Limitless (Version 1.03 tested) is a multiband processor that uses six Band Strips with linear phase filters, each with adjustable frequency centers, band gain faders, mute/solo buttons, and individual release time settings. There are nine additional Advanced controls, a 64x oversampled pre-limiter Clipper section with a choice between three different clip algorithms, plus a Dither dropdown menu with noise-shaping/bit-depth preferences.
To monitor everything, Limitless has several information-rich, resizable screens with four resident Master controls: Threshold, Ceiling (or maximum output), and Release time that groups the release times for all six Band Strips together.
There are zoomable PPM and GR meters and fully integrated EBU R-128 Loudness metering with both True Peak and LRA measurement; you can switch between gated (LUFS) and un-gated (LKFS) measurement. A resettable separate History screen with an adjustable time scale shows a Short-Term loudness line with LRA (loudness variance) displayed around it in gray.
Mastering can be a time-consuming, tedious and incremental process and I thought the onboard storage for eight A/B banks of interim parameter settings a great idea for arriving at the best possible setup for a limiter this deeply programmable with so many options to consider.
Limitless Mastering
My first Limitless mastering project was a Wall Street protest song. The producers used no real instruments--just synths, samples, loops and shouting vocals. They wanted it clean-sounding and louder than loud for downloading and streaming; they complained they were unable to match the loudness of other Electronica/EDM tracks.
My workflow in Pro Tools | HDX started with copying the Aggressive style to Manual mode--you can also step through any Style, or any of the included presets from the Preset tray. There is a lot to learn about Limitless processing parameters from these descriptively named presets.
I used two screens--the Frequency and Time Graphs--to monitor and set up Limitless. Sculpting the sound is made visual using the Frequency Graph screen with its spectrum analyzer overlaid with six multiband crossover nodes. You can delete nodes, change their frequency centers, audition (solo and mute), and set their contribution to the finished sound. While in Manual mode, each band's release time is adjustable.
For this song, after I dialed-in and centered the six frequency nodes, I shortened the Release time for the upper bands and lengthened it for the lower frequency bands. I found the adjustable release timing for each band crucial for obtaining loudness with transparency and minimal collateral damage.
The Time Graph shows the left and right channels' real-time processing history that combines all bands of the limiter. Traveling across the GUI from left to right, it continuously redraws Limitless' current activity. When synched to the song's timeline, it's easy to see where each and every peak and resultant gain reduction happens, plus understand the Release time curve shapes visually. You can set up beat-synched redraw in Preferences in the Setup window.
In Manual mode, the Advanced parameters are freely adjustable at any time, but I didn't touch Input Trim, Slope (adjusts the slope in dB/Oct of the crossovers) or Separation.
Separation at 100 percent (the default setting, but ranges from 0 percent to 200 percent) is the most transparent-sounding, with each of the six bands acting independently. At 200 percent, the band that needs to change the most will change more, causing the other bands to change less. I found using Separation an acquired skill; it was the last adjustment in the quest for the best sound. I did put Stereo Link at 0 percent for wider stereo imaging, with the caveat that no loud mix elements are panned hard left or right.
Look-ahead was set to 0.25 ms (ranges up to 10 ms), but I reduced it to 0.15 ms for a more aggressive sound. This Style had the Dynamics control at 35 percent (50 percent is the default), so the transient limiter was working harder to produce loudness compared to the dynamic limiter. Here I used two different Dynamics settings and automated switching between them: 30 percent for choruses and 60 percent for verses. At 60 percent, the second limiter, with its slower release time, caused the verses (only) to sound smoother.
The Knee parameter is applied before the first limiter, and either narrows (hardens) or broadens (softens) the range around the exact threshold setting. It was set to 0 dB--i.e., hard limiting. I also switched on ISP so that Limitless prevents Inter-sample Peak Distortion and it works well; I never had any "reds" onscreen or on my Pro Tools interface metering.
I pulled Threshold down to -9.1 dB and set the Release time to 97.62 ms. Ceiling went to -0.8 dB, and that worked out well to produce a single, compatible audio file ready for both CDs and downstream for codecs such as Apple's Mastered For iTunes (MFIT). I had Pop music loudness and density while maintaining the song's dynamics.
Louder Than Loud
But the producers wanted it louder! A particular mastering engineer style uses a clipper to add gain and clip the signal before the limiter. Limitless' Clipper has three algorithm choices: Swell and Swell2 both add third-order harmonic distortion, and the Knee algorithm varies from hard clip (ADC clipping) to soft clip.
I tried Swell2 and put the Drive control up to 7.7 dB and set the amount, a mix between the clipped signal and input, to 50 percent. Oversample was at 16x. I also changed the Weighting control to 124 percent (100 percent is the default) to encourage Limitless to limit the low frequencies more with this bass heavy music.
For me, the song sounded less musical and louder in a painful kind of way but my clients were happy with the sound that certainly fit their angry song!
Options, Options, Options!
Limitless is a complete and very powerful mastering toolkit; it works as transparently as you like, or not! In the past for in-the-box mastering, I always fussed over getting what I wanted using a compressor followed by a limiter. Now as my new, singular mix bus processor, I found Limitless' sound and operation wonderful and worthy of "mastering" its immense capabilities and options. You can have your mixes loud yet retain musicality and high-quality sound with minimal downside. Awesome!
|
|
|
|
|
|