| Back To The Directory |
iZotope/Native Instruments Aurora Reverb
By Barry Rudolph
 |
| iZotope/Native Instruments Aurora Reverb |
Second in their new Catalyst Series, iZotope/Native's Aurora Reverb uses an "adaptive unmasking technology" to produce a clearer sounding reverb without the cloudy buildup that can "muddy" up your entire mix. It is based on Exponential Audio's reverb algorithm but with simplified controls for easily adjusting both the reverb itself and the unmasking technology.
Aurora comes with over 60 presets covering six reverberation categories. There are: Halls, Rooms of various sizes and wall surfaces, Chambers, Plates, Ambiences, and Cathedrals. When changing presets, the RT60 time, as well as all the other parameters, stay the same for comparing different reverb types with the same settings. I tested version 1.0.386.
A Different Set Up
In Aurora's Solo Reverb mode, it can be setup like any reverb plug-in by sending to it from an Aux fader and returning the stereo reverb outputs to your mix bus using a stereo Aux track. But you'll get the full power of Aurora's psychoacoustic analysis by inserting it directly on the track(s) itself.
There are both stereo and mono-to-stereo versions for converting a mono track into a stereo presentation. I tried using one instance of Aurora on a stereo Aux master fader track of a mix of a big, background vocal stack (16 tracks) so the effect is on all those tracks as mixed together.
GUI Controls
Aurora starts with a conventional top section called the Header with mostly global controls. One of the interesting buttons is Bypass. Bypass allows hearing the input signal if you are sending to this reverb from an Aux send. Usually what happens here will be huge increase in level of that signal. Bypass works normally when Aurora is used an insert processor.
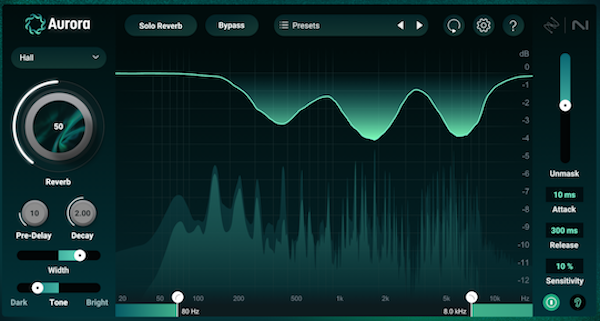
Below the Header is the main display that shows, in real-time, the spectral makeup of both Dry signal and the reverb. Superimposed over this is a visualization of the spectral unmasking as "dips" in the frequencies relative to the plug-in's input. Changes in the amount of unmasking are monitored here. Just below the main display are faders for the 24dB/oct high and low pass filters for constraining the audio input's bandwidth for more focused unmasking tracking. You may design Aurora to unmask only a buildup of a specific band of frequencies.
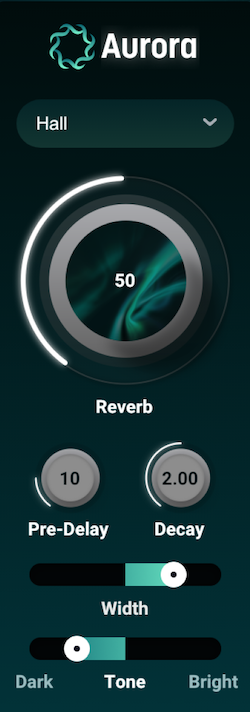
The left side of the GUI are controls for the Reverb Amount using a single knob (0 to 100), Pre-delay (up to a full second), Delay time (0 to 100), Decay is the RT60 control with up to 15.30 seconds (wow!). Below this is the Width (narrow and wide), when maxed out, provides huge stereo width outside of the L/R speakers. However, with this immersion you do lose mono capability and you should check in mono by combining L/R to see what diminishes in level or even disappears!
At the bottom right side of the GUI is the Power button that deactivates the unmasking process; you can hear the reverb without unmasking. If you want to hear what the unmasking is removing from the reverb, click on the small earlobe called Delta. Other controls on the right side are: an Unmask Amount fader, two compressor-like controls for Attack and Release for setting how fast unmasking responds and how long it takes to return to no masking. Sensitivity is input-level dependent and provides gain for super low-level audio and may require adjustment here to obtain the proper Unmask Amount.
In The Studio
I tried Aurora on all sources that I would use a reverb. With Unmasking turned off, I first started listening to the quality of the reverb presets themselves. I started with plates on both reverbs and then checked Halls both set to 2.25 seconds RT60. The decay of the Hall preset with Aurora were more textural and interesting sounding. In general, the sound of Aurora was great and I found it had more stereo width with an impressive sound stage using the same RT60 time as other plug-ins in this price category.
Since the reverb parameters stay the same as I switched through the presets, I was able to quickly compare the qualities of each reverb type! I tried long reverbs to hear the reverb tails--the way the reverberation rings out; it is a little different for each reverb type. For example, the Hall preset has an awesome sounding, slap-back echo encased within the reverb's tail. With the Chamber preset, it created a series of sound "waves"--peaks and dips in the decay simulating sound moving and bouncing around in a highly reflective room. All the reverb types are spot on with realistic emulations.
I even compared Aurora to a cranky old hardware digital reverb from the eighties. Aurora's reverb tails are much smoother but this old reverb does have a "thing". I also checked against a very expensive, standalone DSP system and while that system produced very present, clear-sounding rooms and realistic plate reverbs, it also cost a lot more money--nearly $7,000!

|
| Aurora's Reverb Controls |
Unmasking Tests
For testing Aurora's unmasking feature, I chose a guitar-heavy rock track that I had trouble hearing the reverb distinctly I had on a set of very dense electric guitar tracks--the centerpiece of the whole music production. Making the reverb louder tended to wash out the whole mix and was not good!
Before unmasking, I would decide which reverb type best fit the instrument or vocal. That process might take a few extra minutes in your workflow, but it's worth it. Once I get to know what the presets sound like, this process will take much less time.
I chose the Hall preset for the two, slightly distorted Rickenbacker 12-string guitars that were double-tracked. Then there was also a third 12-string electric with a very clean and chime-like lead tone. That's 36 strings vibrating and adding reverb is problematic and will easily turn all those tones into mush. Sometimes, I like a mushy sound but I needed a little more control over the mush--its character, tone and placement in this wall of sound which could easily turn into a wall of mush!
I bused all three guitars to a single stereo Aux channel with a processing chain that started with PSP's E27 DataMix Stereo EQ, followed by Leapwing's LimitOne Limiter and then followed with Aurora without using Unmasking--just a short room only. The stereo EQ removed some of the guitars lower midrange (680Hz) and I added only a little treble sparkle. The third chiming 12 string went into its own Aurora reverb to make it super wide with its own luscious reverb and it joined the others in the Aux channel mix. An option is to have this third guitar NOT in the Aux mix if you're looking for it to standout separate from the "wall of sound".
Aurora's Unmask fader was at 9.4, reverb's big knob was at 44, Decay was 1.41, no Pre-Delay, Width was maxed, Tone at Bright. High/Low Pass filters were 66Hz and 12kHz respectively. Sensitivity was at 100%. I was able to have a wall of guitars but retain the individual dynamics, character and brightness of each instrument within the stereo mix of them.
I found that Unmasking values of over about 18, just lowers the whole level of the reverb. I liked values up to 10 here for most uses on instruments. But this plug-in opens up a lot of possibilities for sound designs and everyday music mixing. I'm still learning where and when to use this one!
Learn more and get a demo at: iZotope/Native Shop
Aurora sells for $49
|
|
|