The Overheads
The best place to start a drum sound is with the overhead microphones. These mics will tell you just how well the drums actually sound. You'll hear how they are tuned and how good a drummer you have and how the room is adding or subtracting to the sound. If the overheads are placed correctly, you'll hear the kit in the actual balance the drummer achieves. If the drummer is a basher who hits the cymbals as hard as he hits the toms, you'll hear that. If your drummer has a squeaky bass drum pedal or noisy hi-hat rig, you'll hear that too. In short I always work on the placement (balance), tonality (equalization) and ambience (distance) of the overheads first. I also monitor these microphones in mono when balancing. You have to remember that the drum kit is one big instrument with many individual components. When all the mics are up and mixed in correct balance, you have a total drum sound composite. It is a mistake to think of the overheads as just the mics that record the cymbals. Trying to keep the rest of the kit out of the "cymbal mics" by way of radical filtering or EQ, gating and super-tight miking is ludicrous.
Separate Tracks
Separate tracks for each of the kit's components is a good luxury to have for highlighting, in the final mix, certain accents, fills and improvisations the drummer may play. If the overhead sound is not good, chances are the individual components are not any better and you will have to work with the drummer to fix that buzzing floor tom or flat sounding snare drum. You can use as many separate tracks as you want and they still can add up to a poor drum sound! Trying to isolate any problem components by way of extra mics, wacky equalization, blankets or gating is pointless. You might as well overdub each part of the kit separately if you want drum machine-like separation because you'll never get that from a real drummer playing a good drum set.
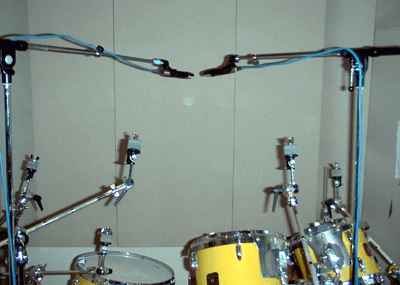
 | | Fig. 1 Close Spaced Overheads |
Fig.1 shows a closely spaced pair of overhead mics. (I have removed the cymbals in all these photos for clarity) These two mics can be setup as an X-Y or M/S pair of stereo mics. If you go with a close pair of overheads, you'll get a strong center image with good phase coherency. Sounds coming from the far left and right of the kit might sound a little quiet in the balance. Resist using more than two overhead microphones...don't put up another mic just to pick up that little splash cymbal on the far left. Far better to move the cymbal closer to the mics or just overdub it later. I have tried using three overheads and had a very hard time getting a non-phasey sound...you might even hear the cymbals "swish" in and out of phase. The most popular overhead method is to space them further apart to get good coverage of the kit. Spacing distance is from two to five feet. Listening in mono will tell you if any drums or cymbals are missing or overly loud.
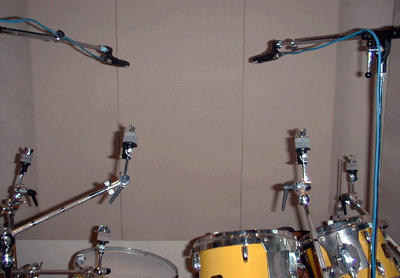
 | | Fig. 2 Wider Spaced Overheads |
Fig. 2 shows a wider overhead mic spacing. Some engineers put the overheads not overhead but behind the drummer's back or in front of the kit facing the drummer. The mics are placed much lower, at a level between the cymbals and the toms. This technique will get you (usually) more of the toms and kick and less cymbal splash and works well for that flailing drummer who hits everything with full force. Be aware that cymbals sound different when miked from underneath.
I always use cardioids for overheads but I have tried omnidirectional and figure-of-eight microphones. I find less phase anomalies and less of the room comes into the overhead sound when I use cardioids. I find that I get a "closer" sound on the kit because the sound of the cardioid overhead mics adds better into the sound of the close microphones. Using omnis will give you a more "airy" sound with less directional information; you may not be able to hear a good left and right of the drummer's kit, i.e. floor tom on the left side and hi-hat on the right side (that is what you'd hear if you are recording a right-handed drummer and monitoring the overheads panned left and right to match the audience's listening perspective). Omnis are going to be phasey sounding and maybe you'll like that sound although check it in mono to see if anything disappears. You do get a more spacious drum sound with omnis in stereo but a little lighter sounding in mono. Figure-of-eight microphones seem to pull in more of the room tone especially if your drum room has a low ceiling. You'll hear better directionality (than omnis) on the kit, but more of the ceiling adding or subtracting to the overhead sound.
Microphone Choice
I like AKG C-414TLII's, C-451 or C-452s, C12As or C12s (if I can get two of them), Neumann KM84s or KM184s or the bright Swedish Milab DC-96Bs for overheads. For omnis try the KM183s and for figure-of-eights, try the Royer ribbon R-121 or the SF-12 stereo. The Royers will require more mic pre-amp gain and you may want to add top end EQ as compared to the condensers I mentioned. Use any good quality condenser microphones for overheads if you are interested in starting with a full-range overhead drum sound.
Other Goodies For Getting Great Drum Sounds
Sennheiser Evolution Series Of Drum Mics
Shure's KSM44 Condenser Mic
Audix i5 Dynamic Mic
Audix Micro-D Series Drum Mic
HQ SoundOff Bass Drum Mute
Shure's KSM32 Condenser Mic
AKG C451B Reissue Condenser Mic
Monster Cable's Turbine Pro In-Ear Speakers
UKKO Contact Drum Mics By B-Band
Heil Microphones' PR 48 Kick Drum Mic
Heil's PR 20 UT Dynamic Mic
Audio-Technica' KP-Drum Mic KitPak
Granelli G5790 Right-Angle SM57 Mic
Kelly Shu Kick Drum Mic Isolation/Mount
|