Intro
The electric guitar, because of its fundamental importance in popular music, is the subject of intense scrutiny and wide differences of opinions. Just what makes a good guitar sound? Compared to all the subtle and not so subtle sounds that come out of an electric guitar amp, fidelity judgments of vocal sounds are easy to make! The recording engineer must, by having good knowledge of the different guitar and amplifier sonic capabilities, coupled with good microphone techniques, achieve the ultimate guitar sound that "fits" the guitar part, song and production genre. A good guitar sound starts with a good player with the right amp and guitar all working together. It is unrealistic to rely on an engineer to make poor gear sound wonderful in the control room. This article offers microphone choices and miking techniques that are good starting points for capturing and recording electric guitar amp sound.
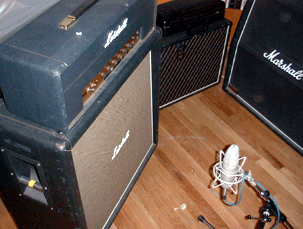
Figure 1 |
Choosing A Microphone
Microphone choice (for me) is as big a part of the guitar amp's recorded sound as the amp and guitar used, volume played and player choice, because the mic type and placement will greatly influence the player's performance and tone.
Dynamic Microphones
The Trusty SM57
The Shure SM57 cardioid dynamic is the most common microphone used to record electric guitar. This started back when all the more expensive microphones had already been used in big tracking sessions. Engineers were left with the lowly Shure to handle those loud, cranky, noisy guitar amps. Fortunately, it turned out that the SM57 was perfect for the task; its frequency response, originally tailored for speaking, matches the mid-range "voice" qualities of the guitar. The SM57 also has a compression effect on loud sounds; it squashes nicely, facilitating the engineer's job of maintaining consistent recording levels.
You'll see engineers push a SM57 right into the grill cloth of an amp cabinet, taking advantage of the proximity effect, which boosts low frequencies when the mic is placed close to a sound source. The SM57 locks in a certain "size" for the electric guitar, maintaining its appropriate place in the mix without additional EQ or compression.
Sennheiser's MD421U
The Sennheiser MD421U cardioid dynamic is also popular. It offers a wider frequency response (more high and low frequencies) than the SM57. A five-position rotary switch adjusts the frequency response from the flat position, called M (for music), all the way to the contoured S (for speech). Generally, I find the 421 brighter with less of the compression effect than the SM57. These mics are also more directional than the Shure, which is important for isolating the sound coming from one speaker in a multi-speaker cabinet.
Condenser Mics
Condenser microphones also work great, but you must be careful not get an overly bright sound. I place them further away from the speakers to capture a cabinet sound. Fig. 1 shows a Shure KSM44 condenser about 20 inches from a 1960's vintage straight Marshall 4X10 cab. (I was auditioning the three cabinets in the picture). Your guitar player might complain that his amp sounds brighter than usual (compared to a SM57) and feel he must readjust his recording knob settings. Condensers pickup more low frequencies from the amp and this may or may not be a good thing. Pushing a lot of air might work in a heavy metal track, but be inappropriate for a lighter pop song. I have also noticed certain condensers sometimes add distortion when close-miking extremely loud amps. Occasionally, the mic's metal wind screen itself gets loose and vibrates. Always use the attenuator pad and maybe the low frequency roll-off. The Neumann U-87 and U-47FET, Shure KSM44 or the Audio-Technica AT-4041 are all good choices.
Condenser microphones also give you the opportunity to experiment with different polar patterns such as omnidirectional and Figure-of-Eight. Omni mics do not exhibit the proximity effect and will pick up more of the total sound of the amp and room tone rather than one particular speaker. I like omnis for more of an ambient guitar sound or for room mics. Figure-of-Eight mics also pickup more of the room but only from directly behind the mic's body opposite the front side.
Royer R-121 Ribbon Microphone
Speaking of Figure-of-Eight mics, my new favorite for guitar is the ribbon microphone. I have a pair of Royer R-121 Figure-of-Eight microphones that offer a whole new range of warm electric guitar sounds. Big, cumbersome and old ribbon mics have been around for years, but using them on loud instruments carried the fear of knocking the fragile ribbon element off their suspension mounts. The lighter weight and smaller Royers can handle huge volumes without the worry. One engineer remarked to me, when he A/B'd the Royer against the SM57, "when you switch from the Royer back to the 57, you wonder where half the guitar sound went." Granted a big, fat and warm guitar sound on its own might sound ideal, but does it fit into your song production? The Royer picks up sound from two opposing sides in what is also called a bi-directional pattern, and you can take advantage of this to get more of the recording space (room) in the sound. Sound entering the rear of the mic is 180 degrees out-of-phase with that coming into the front.
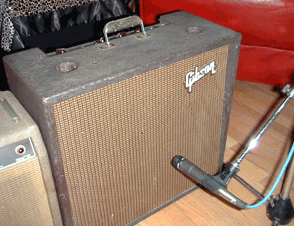
Figure 2 |
Let's Place A Mic
Various mic placements on guitar amps are closely guarded trade secrets amongst recording engineers, but here are some tried and true methods that'll make good starting positions.
Miked From The Front
Fig. 2 shows an SM57 pointed at a very rare 60's Gibson recording amp. I aimed the microphone exactly at the center of the speaker driver inside the amp. (For those who don't know this amp, the speaker is not mounted in the exact center of the cabinet, but I am acting as though it is). To facilitate seeing through the grill cloth, use a flashlight. This position produces the most high frequencies and moving the mic closer increase both level, low frequencies and reduces the cabinet's contribution to the overall sound. There is a whole group of guitarists and engineers who will say there is nothing worth recording coming out of the exact center of a speaker. (I could make a funny retort here too easily). This is true for certain speakers, but I want you to test this position to judge its usefulness. If you want less highs and more warmth, move the mic sideways, parallel to the floor, toward the outside of the speaker. You should move in one-inch increments with someone you trust listening for sound changes in the control room. With a mic inches from the speaker cone, small increments make a big difference.
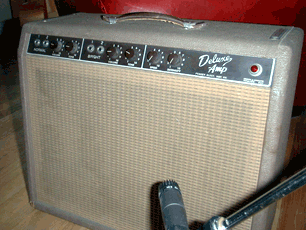
Figure 3 |
Miked At An Angle
Fig. 3 shows an SM57 at a slight angle on a Fender Brown-Face Deluxe. I find this a better position most of the time since you seem to get plenty of highs and more tonality than straight on. It is a good idea to try from both sides and from the top or bottom. If the mic ends up on the floor pointed at the speaker, and sounds good, nail it down! The floor is going to trap bass frequencies and also add tone especially if it is made of wood and is built on a raised foundation.
Tilting The Amp
If the floor seems "to close down the sound," try tilting the amp back. Fenders have chrome legs on the sides of the cabinets for that purpose and also to project the sound up at the musician. VOX amplifiers, like the AC30 and Super Beatle models, came with tilting carriage stands that completely isolated the amplifier from the floor. If possible, I like to set the amp on a folding chair in the studio. Fig. 4 shows an MD421U on a vintage Fender Tweed Deluxe. Here, I have tilted the amp back so that the bottom of the amp's cabinet couples less with the floor. All of these amps are open-backed...so whether there is a wall or open space directly behind them greatly affects bass response.
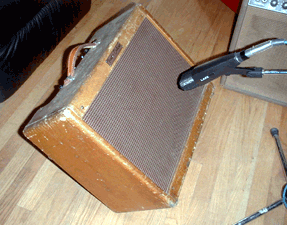
Figure 4 |
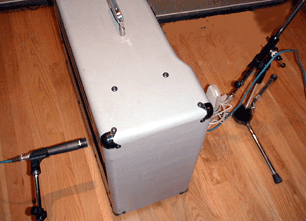
Figure 5 |
Front And Back
Fig. 5 shows an open-backed amp, the Matchless DC30 with an SM57 on the rear and a KSM44 on the front. This setup produces a very unusual tone and allows you to mix the two mics for a mono track or use two tracks placed left and right in your mix. You should flip the phase of one of the mics. Try moving the mics very close to the speakers and processing the rear mic through a very short delay of less than 3ms. Try NOT flipping phase.
Multiple Miking
This is a good way find out which speaker sounds the best in a 4X10 cab and you can put each mic on a separate track and pan them left and right. Be careful with phase, as some speaker manufacturers deliberately wire multi-speaker cabinets in and out of phase. Some engineers will use a condenser on one speaker and a dynamic or ribbon on another. I like to find the best speaker and use two mics on the same speaker. Even then, I sometimes hear a little "phasiness" between the microphones. A very popular setup is an SM57 up close and then, four or five feet away, a U-87 or the tube U-67 for a cabinet mic.
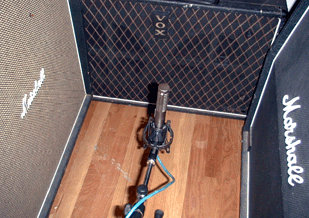
Figure 6 |
In The Middle
I used a Royer R-121 equidistant between a 60's 4X10 Marshall straight cabinet and a reissue 4X10 slant cabinet in Fig. 6. Both cabs are driven by a single top and it won't work unless one of the cabinet's speaker cable is wired out of phase, (or you have determined the cabinets are already out of phase with each other). With both speaker cabinets pushing and pulling together and the warm sound of the ribbon in the middle, you are not going to get any fatter tone, especially for clean sounds. (The VOX cabinet was not in play here...but who knows)??
Scientific Starting Point
Fig. 7 shows a scientific approach to mic placement on a Beatles AC30 VOX amp. The tech in the picture is using test instruments rather than his ears to find the "sweet spot". Sound waves coming out of a guitar amp emanate in all directions, setting up patterns much like a stone produces when thrown into a very still and flat pond. Like in the water, sound waves interact producing multiple reflections and standing waves where sonic energy coalesces. The idea is to place the mic where sound waves add together.
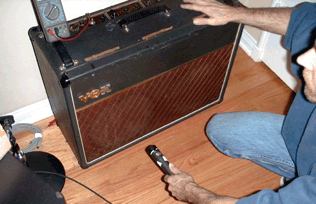
Figure 7 |
To determine this position requires a way to measure output level of a microphone while you move it around in front of the amp. First, set up for a guitar overdub with your microphone choice and fix the headphones so the musician can hear himself...unplug all headphones. Then send a steady, 700Hz oscillator tone into the guitar amp's input jack and place a large VU meter so that you can see it from wherever the guitar speaker cabinet or combo amp is located. If this is impossible to do, plug a voltmeter into the cue system and read the level there. Setting the meter to read mid-scale with the cue system level control and with ear protectors on, (let's make this science project as painless as possible), the microphone should be moved around the front of the amp. In doing this, you'll find many peaks and dips in level. Also, I try to stand behind the speaker so that my body doesn't affect this measurement process. Obviously, as the mic gets closer to the speaker the level goes up but, if you keep a fixed distance and then move the mic left, right or up and down, you'll find a peak level. This is where you should set the mic. Make sure you like the sound you get using the scientific starting point...you may hate it!
Other Methods
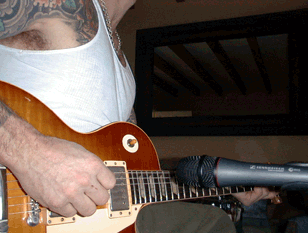
Figure 8 |
These are some other ways to accomplish the task of recording guitar amps. Whether used alone or in combination with the aforementioned, all require much more experimentation and studio time.
Room Mics
Placing mics around the room is useful for effect, especially if you are recording in a great sounding space. This is an easy way to dress up a boring guitar sound...there's lot of room to experiment! (Pardon the pun)!! Try different distances and heights, microphone types, EQ, compression and delay. I sometimes tape pressure zone microphones to the control room glass or leave the studio doors open or put a mic down a hallway. If you have an elevator shaft or stairwell handy, use that...put the amp at the bottom and a mic at the top.
Recording The Electric Acoustically
Fig. 8 shows a Sennheiser e865 handheld condenser miking the "Holy Grail" of electric guitars: the 1959 Les Paul Sunburst. Obviously, you will have to put the amp in another room for this to work. But I have recorded amps and mics on separate tracks and it makes a very unique combo. Great for arpeggios!
Direct Recording
Direct recording, also called "DI," from the British term "direct injection," is simply recording the output signal of the guitar itself.
Electric bass guitar is almost always recorded this way because of its super present and clean sound. Guitarists like to play through some type of stomp box or pedal just to "vibe up" this very pristine sound. There is a whole category of guitar pedals, processors and effects, all meant to be recorded directly.
Whether you use a stomp box or not, here are a few caveats for getting the best sound from your guitar or bass. First of all, remember that the typical output signal of an electric guitar is very low level and very high impedance. Low level means that it will need amplification and the high impedance requires matching to your recording system. Guitars are equipped with either passive or active pickup systems. Passive is where the strings vibrate in the magnetic fields of the pickup and generate an electrical signal that is processed by passive tone control circuitry and then fed to the output jack. Everything is the same with active pickups except that the electrical signal from the pickups is electronically amplified within the tone circuitry and then passed out the output jack.
The engineer should be aware of which system is used in the guitar when recording direct. Vintage guitars, because of the old and weaker pole-piece magnets in the pickups, put out an even weaker signal and that is why a lot of people replace those pickups with newer and hotter pickups such as Seymour Duncan's Hot Rails. Furthermore, when attaching a direct box (or anything else such as a digital tuner), the output impedance is lowered (if the attached device is not of sufficiently high impedance) diminishing the guitar's signal further to say nothing of the tone...particularly the high frequencies. The engineer should only use a direct box with a very high input impedance to avoid an effect called "loading."
On the active side there is less stress since the built-in amplifier inside the guitar, (that always seems to need a new battery), jumps up the level and lowers the impedance, so whatever you connect it to, has less affect. The guitar's super-output level, if not treated correctly, may become a mixed blessing because it affects your amp's tone and settings and the direct recording sound.
When direct recording guitars with active pickups, I use a simple, good quality matching transformer, (such as a Jensen), that converts to the standard microphone pre-amp input impedance of about 150 ohms. I hardly ever use an active direct box for active guitars...too much activity!! For passive guitar pickups, I like to use active direct boxes such as the Raven Labs, Countryman Associates or the Demeter Tube models. These are all electronic isolation amplifiers with extremely high input impedances that will not load your guitar's output signal and change the tone.
Speaker Jack Direct
Another way to record direct is by way of the speaker jack. A cable from the external speaker jack is connected to a matching transformer and that signal is recorded. The difference is that the sound of the amp, (with all its personality), and the guitar are recorded. There are several models of power soaks or power resistor loads available that take the place of the speaker and provide an isolated recording line output. You can also put a mike on the speaker and mix in the direct signal. You'll have to check phase again and probably use an equalizer.
Musicians In The Control Room OR NOT!
For an electric guitarist, there is no better way to achieve a great sound than by sitting or standing next to the amp. There is an important interaction between the guitar's body and the vibrations set up by the amplifier. Increased and unique sustain qualities, feedback effects and tone enhancement due to acoustic reinforcement only happen if you play next to your amp. When I listen to some of the newer rock records, I miss that sound.
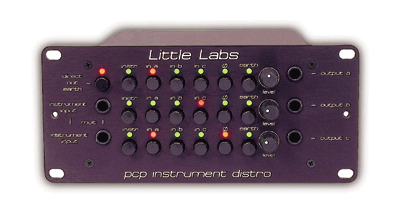
Figure 9 |
In the recording studio, it may not be practical for the guitar player to be near his amp since the wide volume differences of all the sound sources in the same room (drums, bass, other guitars and singers) preclude the use of higher guitar amp levels during live band tracking sessions. So the guitar amp or speaker cabinet is placed in an isolation booth for maximum control and separation. The guitarist can sit out in the studio with the drummer and the rest of the band or even in the control room with the producer and engineer, but he must rely on a good monitor mix to play along. In this scenario, the guitarist loses all sonic interaction between his guitar and amplifier retaining only the basic tonal qualities of his amp.
Typically when a player is remote from his amplifier, the amp top is set next to the guitarist and heavy-gauge cables connect it to the speaker cabinet. In the case of one-piece combo amps, running super-long guitar cords from the guitar to the amp is unacceptable, since the distributed capacitance along the long cable acts as a high frequency roll-off filter on the guitar's delicate output signal. I recommend using a small buffer amplifier for this job that "conditions" or buffers the guitar's signal for long cable runs. The Little Labs PCP Instrument Distro, shown in Fig. 9, is a distribution amplifier and switching matrix for sending electric guitar signals to multiple amps and/or at the same time, to +4dBv professional outboard signal processing gear. The Distro also provides a clean, direct signal for recording directly to your recorder.
Pictures Courtesy Of The Oliver Leiber Collection.
| |